Showing posts with label Tootypup. Show all posts

Wednesday, April 10, 2013

China Doll


China Doll


This tag tutorial was created by myself 4/10/13 for this blog Desertsplace.
Any other similar is purely coincidental. 
Please do not copy or steal my tags/ tutorials or claim them as your own.

This tag tutorial was made with the kit called China Doll by Tootypup and can be found HERE
Artist tube is from Gaetano Di Falco and can be purchased HERE


Open new image 600x600 Transparent background checked

Open tree 3, resize 40% copy and paste to the right near the first tree,
go to layers, duplicate, go to image and flip.
Open tree1 resize 30% copy and paste as new layer in the middle on the right side,
go to layers, duplicate, go to image flip. Using the move tool , move them to where you like them best.
Open garden 1, resize 50%, copy and paste as new layer in the center.
Open bird 2, resize 5%, copy and paste as new layer on the garden room where you like him.
Open bird 1, resize 7%, copy and paste as new layer a little bit behind bird 1.
Open your tube, resize if necessary, where you like. With mine I used some of the leafy elements, umbrella  and resized them
to put around the bottom of her.
Open gong 1, resize 25%, copy and paste as new layer on the left side of the garden building
Open fan7, resize 15%, copy and paste as new layer, in front of the gong.
Open butterfly 1, resize 7% or to your liking, copy and paste as new layer
Open butterfly 2, resize 7%  or to your liking, copy and paste as new layer.
Open vase 5, resize 20%, copy and paste bottom on the stand of the gong.
Open deco 5, resize 25%, copy and paste as new layer over the vase and gong bottom right side. 
Add your artist credits and save as png. Add your name and this tag tutorial is now complete!
Thank you for trying my tutorial.
xo Desert xo

Sunday, December 18, 2011

Silver Memories

Silver Memories


Beautiful kit Silver Bells by TootyPup
can be purchased HERE
Artist tubes from Barbara Jensen
can be purchased HERE
Merry Christmas
xo Desert xo

Saturday, November 26, 2011

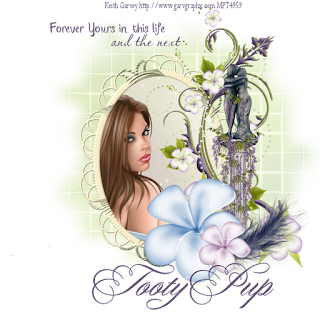
FTU Forever in this life


FTU Forever in this life.


This tutorial was written by myself 11/26/11 for this blog, Desert's Place
Any resemblance to any other tutorials is purley coincidental.

Isle Esme Blogtrain Freebie from TootyPup Here
WCL MASK 64 HERE
Bethany tube from Keith Garvey Here
VM Natural Filter, Sparkle

Open new image 600x600 transparent background checked
Open TP_Paper07 copy and paste as new layer
Open WCL Mask 64 click back paper layer of new image.
Goto layers, new mask layer, from image. Use the drop down to find WCL Mask 64, Source luminance checked.
Apply. Click on layers, merge group.
Open TP_CameoFrame 02 resize 40% copy and paste as new layer.
Using the magic wand, click inside of the frame, goto selections, modify, expand 2 and apply
Open TP_Paper 07 resize 40% copy and paste as new layer, click on the paper layer and move it slightly to the right
selections, invert and hit the delete key on the keyboard. Select none.
Drag this paper layer down under the frame. With the paper layer still selected,
goto Effects, plugins, VM Natural,Sparkle with these settings: Max size 22, Red 255, Green 255, Blue 255
Rnd Color on/off 255, random seed 142 click ok.
Copy and paste your tube as new layer, position in the frame where you like it.

Open TP_Statue04 and resize 50%, copy and paste as new layer on the right side of frame.
Open TP_Flower06, resize 20% copy and paste as new layer at bottom of statue.
Open TP_Feather03, resize 30%,copy and paste as new layer over the blue flower.
Add the sparkle effects again using the same procedure
and settings listed above
Open TP_Flower04, resize 10%, copy and paste as new layer over the feather.
Add the sparkle effects again using the same procedure and settings as above.
Layers, new raster layer. Add any text you wish.
I added mine with Passions Conflict Rob, and PC Rebecca Brush.
Layers, merge visible. Add your credits and save.
I hope you enjoyed doing my tutorial

xo Desert xo

Friday, November 25, 2011

PTU Christmas Time

Christmas Time


This tutorial was written by myself 11/19/11 for this blog, Desert's Place
Any resemblance to any other tutorials is purley coincidental.
The kit I am using is PTU Vintage Christmas from Tooty Pup Scraps, you can purchase
it at Twilight Scraps HERE
The tube I am using is by Amy Brown, you can get from CDO HERE

Plugin needed Xero Fritillary
Alien Skin EyeCandy 5 Impact Gradient Glow (Optional)
Font I used is Passions ConflictROB

Let's Start

Open new image 600x600 transparent box checked
Open TP_SteamPunkChristmas Deco_6 resize 50%, image rotate right place in center and to the right.
Layers, duplicate,image, mirror, image and flip.
Open TP_bronze gear04 resize 75%
With the magic wand click inside the gear layer, goto selections, modify, expand 3 ok.
Open paper_09 copy and paste as new layer,selections, invert and hit the delete key. Pull that layer under the gear layer.
With the paper layer still active (or click on it) , go to effects, plugins, xero, fritillary with these settings
granularity 5, aggression, 36, tesselaton 10 variation 18 or you can hit random at the bottom and chose what you like.

Click back on the gear layer

open TP_Steampunk Christmas bow 4 resize 50% copy and place as new layer in the middle left side of gear
Open TP_Steampunk Christmas Lantern01 resize 20% copy and paste as new layer middle right side on gear

Open TP_ Clock 06 resize 50% copy and paste as new layer. Place top middle of gear
Open TP_Tag 04 resize 20%, image, free rotate check left, 45 free check
Open TP_Holly 04 resize 20% copy and paste near the bottom of the TP_Tag04.


Open your tube andcopy on the paper layer of the frame and paste your tube as new layer, to resize, use the pick tool.
Now this next part I may lose you on because I am unsure of how to explain it but I will try. If you have an easier way to do this
that is fine :) Whichever you feel better with

Click on the tube layer, then layers, duplicate. Drag this layer down under the frame layer and close it off. Click on the original tube layer and
erase any parts of it that may be sticking out where you dont want them to (like the wings were on my tube at the top) ( I wanted her leg sticking out so
I did not erase that part. Once this is done, click on the closed tube layer and reopen it
erase any parts you do not want, ( I erased the peices that were over the flowers deco but kept the leg again...
It takes a little practice but once you get use to it its easy. (If this doesnt make much sense just place your tube how you
want her to be lol)

Add drop shadow to all layers except the tube and paper layer. My settings are V1 ,H2 ,O67, B 5.00

Layers, merge all visible, if you are happy with it then add your credits and save.

I added a gradient glow to the name which is optional.

Thank you for trying my tutorial, I hope you enjoyed it.

xo Desert xo

Monday, November 21, 2011

My First Tutorial

So to break in this blog right off the bat, I thought I would write my first tutorial.

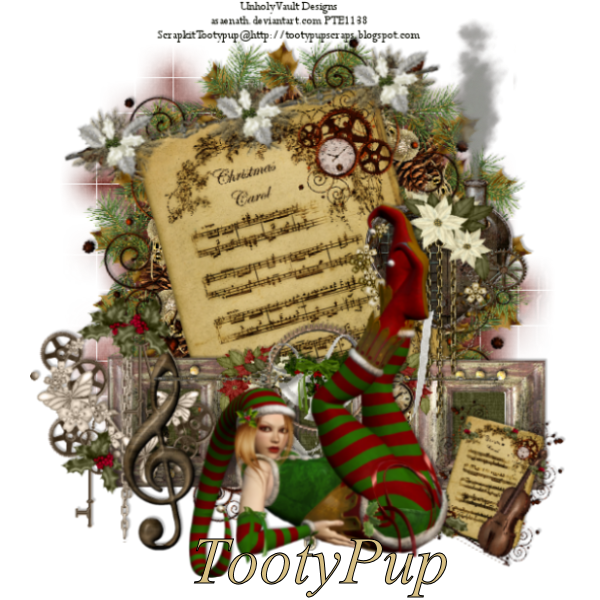
It is called Vintage Christmas. It is made with a beautiful kit from TootyPup.
So if you are ready, here we go!


I LOVE STEAMPUNK and I enjoyed using this Vintage Christmas kit, with so many beautiful elements that are
very easy to work with.

This tutorial was written by myself 11/19/11 for this blog, Desert's Place
Any resemblance to any other tutorials is purley concindental.
The kit I am using is PTU Vintage Christmas from Tooty Pup Scraps, you can purchase
it HERE
WCL Mask 84 which you can get HERE

tube is from unholy vault and was part of the christmas gift 2011 from PTE HERE


All dropshadow is V -2, H2, Opacity 29,Blur 2 except on the mask layer I did not use one.

Open new image 600x600 transparent box checked
Copy and paste paper 51 as new layer
layers, new mask layer, from the dropdown chose WSL84, source luminance checked
apply mask, merge group

Open TP_ChristmasWreath 2 and re size 60% copy and paste as new layer in center
Open TP_ChristmasCarol2 and re size 50%, paste and paste as new layer, rotate slightly left using the pick tool.
Open TP_clusterframe2 and re size 30% ,copy and paste as new layer over lower part of christmas carol2 and wreath
Click inside all the frame boxes with magic wand, selections, modify, expand 3
Copy TP_paper 51 and paste as new layer, selections, invert, and hit the delete button,
selections select none, drag paper layer under frame.
Open TP_ChristmasDeco 1and re size 40% ,copy and paste as new layer on right side of carol paper and wreath.

Open TP_SteampunkChristmas bar2 and re size 50%, copy and paste as new layer at top of carol paper rotate slightly left with
pick tool.
Open TP_ChristmasCarol7 and re size 20%, paste as new layer at lower right side over frame, rotate
slightly right with pick tool.
Open TP_ChristmasSteamheart1 and re size 50%, copy and paste as new layer middle right side.
Open TP_Christmasbar1 re size 50% , copy and paste as new layer, place top middle of frame

Add your tube, and credits, layers, merge visible and SAVE

I would love to see your results if you try my tutorials, you can send them to
me at desertgirl2020@yahoo.com

Thank you for trying my tut!